Quick Start
This guide will help you quickly get started with UniCore. You will:
- Deploy a UniCore instance locally using Docker Compose.
- Issue a Credential to a user.
- Verify that Credential.
Prerequisites
- Docker
- UniMe app or any other Identity Wallet that supports the following standards:
- OpenID for Verifiable Credential Issuance Working Group Draft 13
- OpenID for Verifiable Presentations Working Group Draft 20
- Self-Issued OpenID Provider v2 Working Group Draft 13
Download UniMe
Download the UniMe app on your mobile device:
Configuration
1. Clone the UniCore Repository
Open a terminal and clone the UniCore repository:
git clone https://github.com/impierce/ssi-agent.git && cd ssi-agent
2. Copy the Example Configuration File
Copying the example configuration file sets up default settings required by UniCore.
cp agent_application/example.config.yaml agent_application/config.yaml
3. Navigate to the Docker Directory
cd agent_application/docker
4. Copy the example environment file
cp .env.example .env
5. Set the UNICORE__URL Environment Variable and Update the .env File
First, set the UNICORE__URL environment variable using your private IP address:
export UNICORE__URL=http://<your-private-ip-address>:3033
In a typical UniCore setup, the UNICORE__URL variable would be set in the .env file. However, for the purpose of this quick start, it is more practical to set the variable as shown above, allowing it to be reused in the curl commands throughout this guide.
- Replace
<your-private-ip-address>with your machine's local IP address.- On macOS/Linux, find it using:
ifconfig- On Windows, find it using:
Next, in theipconfig.envfile, set theUNICORE__URLvariable to reference the environment variable:
UNICORE__URL=${UNICORE__URL}
This configuration ensures that Docker Compose uses the UNICORE__URL environment variable you've set in your shell.
Make sure to export the UNICORE__URL environment variable in the same terminal session where you will run docker compose up, or ensure that the variable is available in your environment.
6. Update the Docker Compose File
Open the compose.yaml file in a text editor and update the image value for the ssi-agent service to impiercetechnologies/ssi-agent:1.0.0-beta.8 (or newer version).
ssi-agent: impiercetechnologies/ssi-agent:1.0.0-beta.8
Deployment
Run the following command to deploy UniCore:
docker compose up
This command starts the UniCore services defined in your compose.yaml file.
Issuing a Credential
To issue a Credential, follow these steps:
1. Post the Credential Data to UniCore
Open a new terminal window and ensure the UNICORE__URL environment variable is set (if not, set it again):
export UNICORE__URL=http://<your-private-ip-address>:3033
Then run:
curl --location "$UNICORE__URL/v0/credentials" \
--header 'Content-Type: application/json' \
--data '{
    "offerId":"001",
    "credentialConfigurationId": "w3c_vc_credential",
    "credential": {
        "credentialSubject": {
            "first_name": "John",
            "last_name": "Doe"
        }
    },
    "expiresAt": "never"
}'
This command sends a POST request to create a new Credential Offer with the specified data.
2. Retrieve the URL-Encoded Credential Offer
Run:
curl --location "$UNICORE__URL/v0/offers" \
--header 'Content-Type: application/json' \
--data '{
    "offerId": "001"
}'
This returns the URL-encoded Credential Offer.
3. Render the Credential Offer as a QR Code
To proceed, you need to render the URL-encoded Credential Offer as a QR code. You can use any method or tool you prefer to generate the QR code. Here are some options:
Option 1: Using Command Line with qrencode
Install qrencode (if not already installed):
- macOS:
brew install qrencode
- Ubuntu/Debian:
sudo apt-get install qrencode
Generate the QR code:
qrencode -o credential-offer.png -s 10 '<URL-ENCODED-CREDENTIAL-OFFER>'
- Replace
<URL-ENCODED-CREDENTIAL-OFFER>with the actual value returned from the previous step.noteThe URL-encoded Credential Offer to be encoded must be enclosed within single quotes ' '.
Open the QR code image:
open credential-offer.png
Option 2: Using Online QR Code Generators
- Go to an online QR code generator such as QR Code Generator.
- Paste the URL-encoded Credential Offer into the text field (as Plain Text).
- Generate the QR code image.
The key requirement is to generate a QR code from the URL-encoded Credential Offer so that it can be scanned by the UniMe app.
4. Scan the QR Code with UniMe
- Open the UniMe app on your mobile device.
- Scan the QR code to accept the Credential Offer.
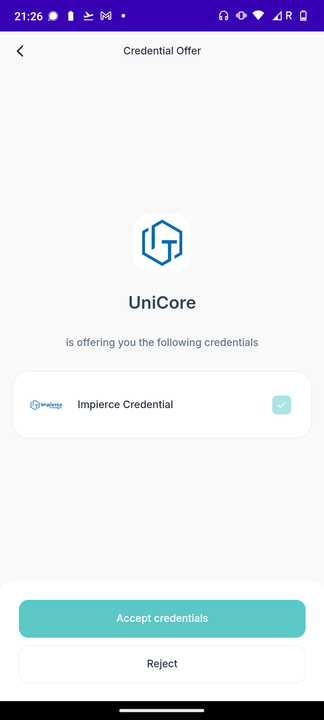
After accepting, the Credential will appear in the UniMe app.
Verifying a Credential
Now, request the user to present their Credential:
1. Create a URL-Encoded Authorization Request
Ensure the UNICORE__URL environment variable is set (if not, set it again):
export UNICORE__URL=http://<your-private-ip-address>:3033
Then run:
curl --location "$UNICORE__URL/v0/authorization_requests" \
--header 'Content-Type: application/json' \
--data '{
    "nonce": "this is a nonce",
    "state": "state_id",
    "presentation_definition": {
        "id":"Verifiable Presentation request for sign-on",
        "input_descriptors":[
            {
                "id":"Request for Verifiable Credential",
                "constraints":{
                    "fields":[
                        {
                            "path":[
                                "$.vc.type"
                            ],
                            "filter":{
                                "type":"array",
                                "contains":{
                                    "const":"VerifiableCredential"
                                }
                            }
                        }
                    ]
                }
            }
        ]
    }
}'
This creates an Authorization Request specifying the type of Credential that is being requested.
2. Render the Authorization Request as a QR Code
Similar to how you generated the QR code for the Credential Offer, you now need to render the URL-encoded Authorization Request as a QR code. You can use the same method you used earlier:
- If using
qrencode, run:
qrencode -o authorization-request.png -s 10 '<URL-ENCODED-AUTHORIZATION-REQUEST>'
- Replace
<URL-ENCODED-AUTHORIZATION-REQUEST>with the actual value returned from the previous step.noteThe URL-encoded Authorization Request to be encoded must be enclosed within single quotes ' '.
- Open the QR code image:
open authorization-request.png
- If using an online tool or app, input the URL-encoded Authorization Request to generate the QR code.
The process of generating the QR Code is exactly the same; you're just using the new URL-encoded Authorization Request instead of the Credential Offer.
3. Scan the QR Code with UniMe
- Now scan the QR code using the UniMe app.
- The app will prompt to share the Credential.
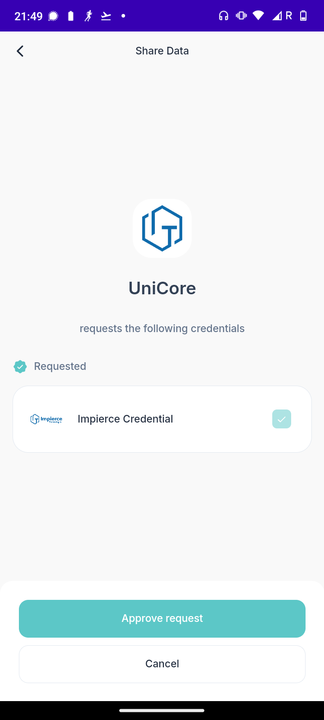
Upon acceptance, UniCore will verify the validity of the Credential.
In order to check whether the Credential was successfully verified by UniCore, you can run the following command:
curl --location 'http://localhost:3033/v0/authorization_requests/state_id'
This will return an object containing a "vp_token" field. If the value of this field is not null, the Credential was successfully verified.
Troubleshooting
-
Problem: QR code not scanning.
Solution: Ensure the QR code contains the correct URL-encoded data and that it's clear enough for the camera to read.
-
Problem: Cannot connect to UniCore from mobile device.
Solution: Check that both devices are on the same network and that firewall settings allow incoming connections on port
3033.
Additional Notes
- Firewall Settings: Ensure your machine allows incoming connections on the required ports.
- Access from Mobile Device: Your mobile device must be on the same network as your UniCore instance.
- Environment Variables: Remember that environment variables set in your shell are not persisted across terminal sessions. You may need to set
UNICORE__URLin each new terminal or include it in your shell's startup script.
By following this guide, you've:
- Deployed UniCore locally.
- Issued a Credential to a user.
- Verified the Credential using the UniMe app.